


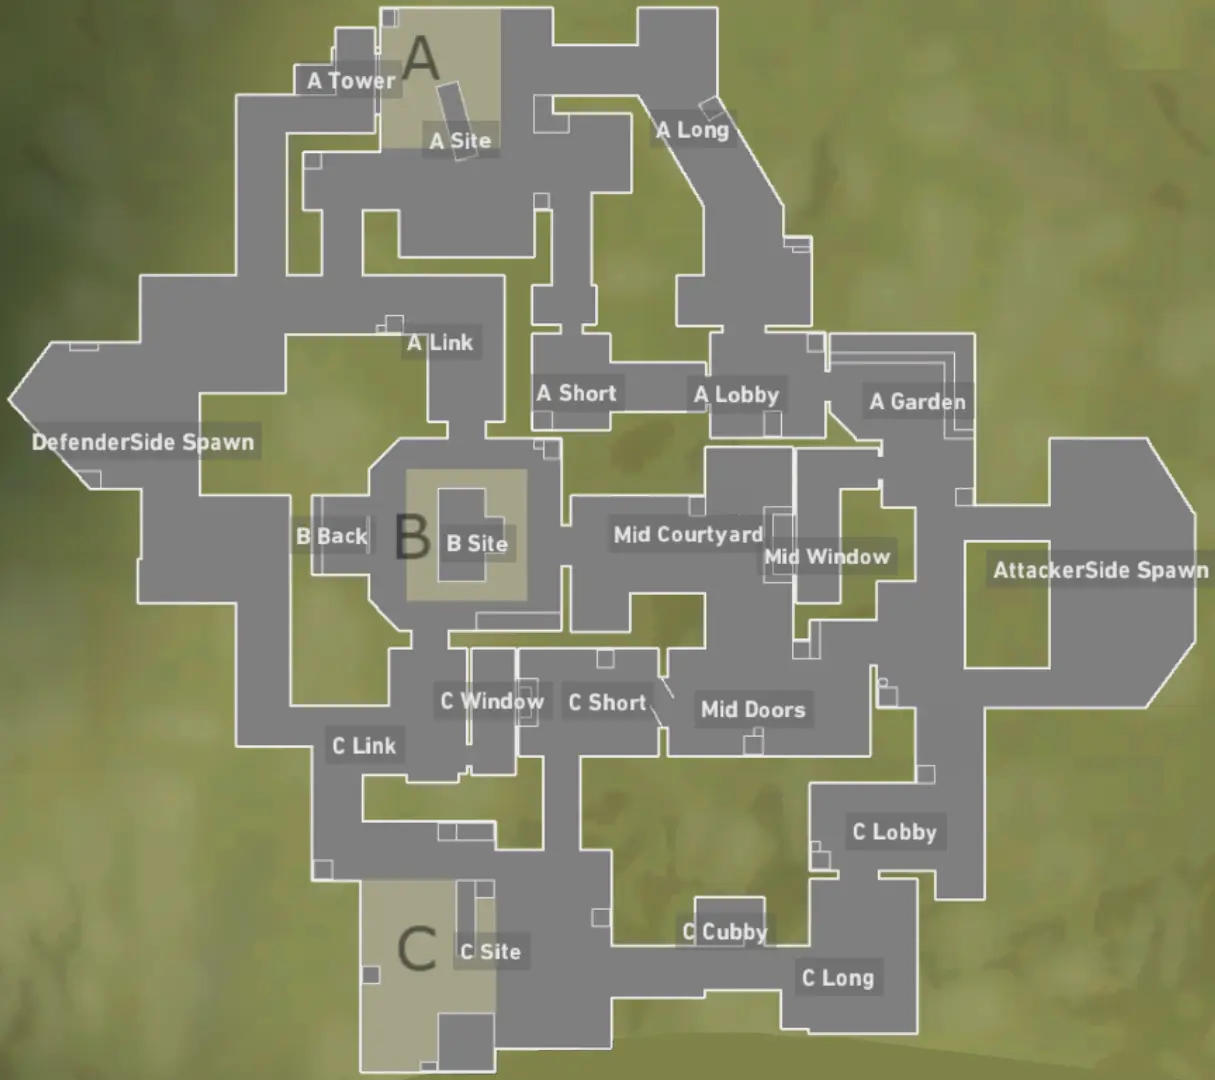
The Haven map Valorant stands out from every other battleground in Riot Games’ tactical shooter due to one unique element: three bomb sites. Unlike every other map that offers two sites (A and B), Haven introduces Site C as a third strategic location. This structural difference redefines standard rotations, economy strategies, and team compositions.
In this comprehensive guide to Haven, we break down the map’s layout, discuss Haven callouts, suggest the best agents for Haven, and offer detailed strategy breakdowns.
Overview of Haven Map
Haven is set in a serene monastery in Bhutan, blending peaceful aesthetics with intense tactical gameplay. The map is large, multi-laned, and heavily rotation-focused due to the presence of three distinct sites: A, B, and C. This structure forces teams to rethink traditional setups and maintain map control more proactively.
There are five major lanes:
- A Long
- A Short
- Mid Courtyard
- Garage
- C Long
Holding mid becomes especially important on Haven. It provides rotational flexibility and allows quick pivots between all three sites. Losing control of mid exposes both B and Garage, giving attackers free access to spike plants or post-plant scenarios.
Which Side Is Better on Haven?
Many players ask: “is Haven attack or defense sided?” The answer lies in the map’s structure. While defense typically has the edge on two-site maps, Haven leans slightly attacker-sided, especially in lower to mid-rank lobbies. With three spike sites to defend and limited utility to cover them all, defenders often find themselves stretched too thin. Coordinated attackers can capitalize on this by faking pushes, manipulating rotations, and overwhelming isolated defenders.
That said, in coordinated play or pro-level matches, Haven balances out more evenly, with precise defensive utility and early map control making a big difference.


Detailed Haven Callouts
Understanding Haven callouts is essential to coordinating successful attacks and defenses. Below is a breakdown of the most crucial locations by site:
A Site Callouts
- A Lobby: Entry point from attacker spawn leading into A Short and A Long.
- A Garden: Small area connecting A Lobby and A Short.
- A Short: Shorter path to A Site, directly facing A Link and the front of site.
- A Long: Long corridor giving access to A Site from the far right side.
- A Site: Main plant zone with boxes, near the entry points from A Short and A Long.
- A Tower (A Heaven): Elevated platform above A Site, accessed from Defender Side Spawn.
- A Link: Connector between A Site and Mid Courtyard, leading toward B Site.
B Site Callouts
- B Site: Central and tight area with multiple box cover and common for quick rotations.
- B Back: Area behind B Site near Defender Side Spawn.
- B Window (commonly called Mid Window): Elevated window looking into Mid Courtyard from the defender side.
- Mid Courtyard: Central open area connecting all three sites.
- Mid Doors: Entry point from C Lobby to Mid Courtyard.
- Mid Window (from attacker side): Can refer to the space viewed through Garage or Mid Doors.

C Site Callouts
- C Long: Long corridor connecting Attacker Spawn directly to C Site.
- C Lobby: Entrance area from spawn toward C Long and Cubby.
- C Cubby: Small corner pocket on the way up C Long, often used for holding angles.
- C Site: Main plant zone, open area with some cover and elevated platform in the back.
- C Platform: Raised defender-sided platform overlooking C Site.
- C Logs: Corner beside the platform at the back of site.
- C Link: Connector from Mid to C Site via Garage Window and C Window.
- Garage: Commonly contested entry from Mid to C, connects through C Window and Garage Door.
- C Window: Exit of Garage facing into Mid/C Link.
Mid Area Callouts
- Mid Courtyard: Center of the map, accessible from A Link, B Site, Mid Doors, Garage, and C Short.
- C Short: Narrow path between Mid Courtyard and C Site.
- A Short: Path between Mid Courtyard and A Site.
- Mid Doors: Entry from C Lobby into Mid Courtyard.
- Mid Window: Overlooking Mid Courtyard from B Window (defender’s side).
Best Agents for Haven
Choosing the best agents for Haven requires balancing map control, site anchoring, and information gathering. The three-site structure means each role has more weight. Here's our agent breakdown by role:
Initiators:
Sova: A must-pick on Haven due to his recon dart effectiveness. His arrow can clear long sightlines (like A Long or C Long) and provide crucial info for B Site executes.
Breach: Great for clearing B Site and Garage. His flash through walls and aftershock can zone enemies from strongholds.
Controllers:
Omen: Versatile smokes that can cover multiple areas at once. His teleport offers unexpected flanks.
Astra: Her global utility can control all three sites if used with coordination, especially useful for post-plants.
Sentinels:
Cypher: Excellent for info denial on flanks. His tripwires are difficult to bypass in narrow chokepoints.

Duelists:
Jett: Dominant on C Long with Operator. She can entry with dash and create chaos.
Neon: Ideal for fast-paced C rushes or disrupting B Site control. Her slide and wall enable aggressive openings, while her ult makes her a deadly flanker during retakes.
Ultimately, the best agents for Haven depend on your playstyle, but the above picks are meta-defining choices for coordinated and solo play.
Optimal Haven Team Comp
The ideal Haven team comp combines information gathering, map control, and position holding. It is not always possible to find the perfect agents for the map, but there are always alternatives:
Initiator
Sova remains the primary initiator on Haven due to his recon and post-plant value.
Breach can be replaced by a second duelist such as Raze or Yoru in fast-paced team comps focused on early pressure.

Controller
Clove(replaces Omen). Provides flexible smoke utility, great for clutch scenarios with resurrection and strong site-holding power.
Astra(alternative controller). Excellent for coordinated play with global control and post-plant setups.
Sentinel
Killjoy(replaces Cypher). Great for locking down sites with turret, Alarmbot, and Nanoswarm utility. Excels in passive map control and stall.
Duelists
Neon (replaces Jett). Offers rapid entry and mobility through tight angles like A Short or C Long.
Yoru (replaces Breach) in double-duelist lineups. Effective for confusing defenders, flanking, and creating lurk pressure from Garage or Mid.
Raze another Breach replacement in aggressive comps. Strong for clearing space and applying explosive entry pressure.


Attack Default Strategies
A Site Execute:
- Use Sova recon on A Short or A Long to clear close angles
- Smokes on Heaven and CT to block vision
- Push together via Short and Long, sandwiching site anchors
- Plant for Long and play post-plant from A Lobby with recon or shock darts
C Site Hit:
- Fast C Long rush with Jett dash and smokes on Platform and CT
- Use Breach stun or Omen blind in Garage to prevent rotates
- Garage lurk is key to catching rotators

Mid to B:
- Cypher uses camera Mid for early info; Omen smokes A and C Link
- Breach stuns B Site from Mid, while Sova Darting; Jett dashes into Site
- Team pushes Mid to B Link together
- Plant quickly and hold from Mid Window, Link, and B Site
 Haven A execute
 Haven C execute
 Haven B execute
Defense Default
Defending Haven is about information denial and rotational discipline.
- Cypher/Killjoy should anchor C or A with utility.
- That frees up teammates to control Mid or assist B.
- Don’t stack three players on one site.
- Use Mid control to rotate fast. B Site should be played retake-heavy with an Initiator nearby for clearing.
- Playing aggressively in Garage or A Short can net early picks and stall attackers


Comments1