


We continue to discuss the best spots on various Valorant maps for both the attack and defence sides. Today, we move on to the first official map that appeared in Valorant after the end of the beta test. Ascent was added to the game along with the first 1.0 update, which was released on June 2, 2020, and the location is designed in the style of the famous Italian city on the water, Venice. The map itself is quite standard, with two Spike planting sites and without unusual teleports or ziplines, but each plant has a pair of metal doors, making this small feature increase the number of positions that can be occupied. Today, the Bo3 editorial team has prepared material for you, in which we will tell you about the best spots on the Ascent map for the defence side.
Point A
1

The first spot at point A is on an elevation, directly on the path from where the defence side enters the plant. The position is not new, but despite its familiarity, it is quite effective. From here, a player can control both entrances to the planting site, and the long distance to the enemies allows for effective use with an Operator. However, the position has its downsides, the first and main one being the problem of retreating. If enemies still enter the point, it will be very difficult for you to escape unless you are playing agents like Omen or Jett. Also, remember that the main box that serves as your cover is penetrable, so as soon as enemies learn about this feature, the spot will become even more dangerous.
2

The second spot is semi-enclosed and is located right on the planting site, between a large black box and the wall. Unlike the previous position, this spot is very protected and offers players many opportunities for manoeuvring. From here, you can control both entrances to the plant, and additionally, you have the option to move to the left or right. This allows you to control only one passage but, in return, keeps you safe from enemies entering from the other side. The position involves close-range encounters, so it's better to use weapons effective at such distances.
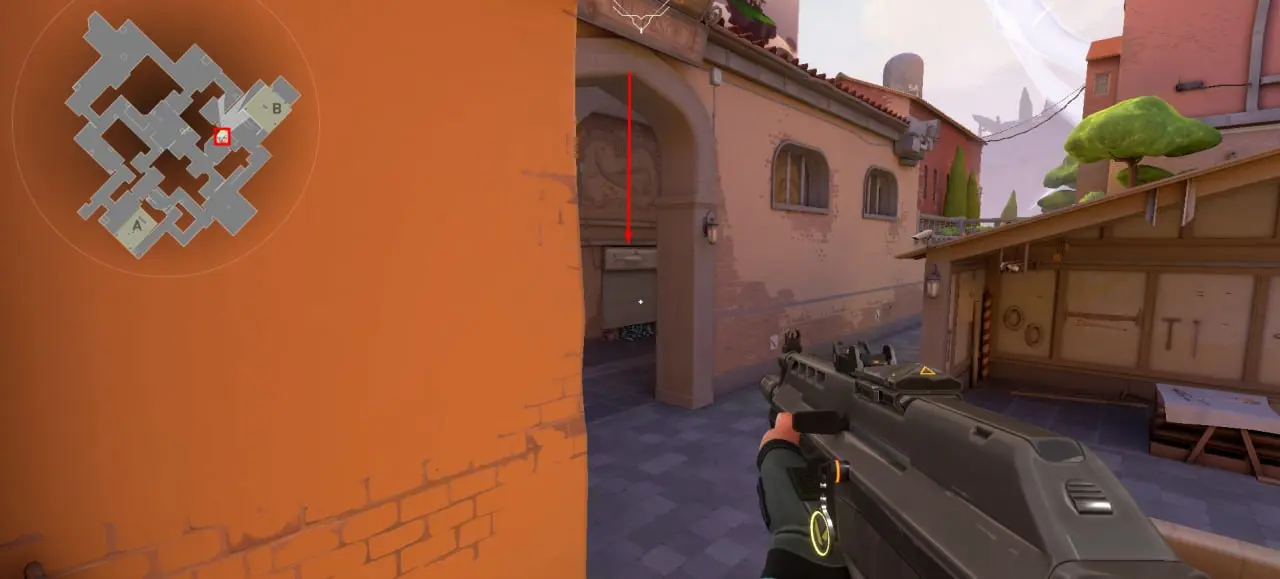
3

The next position is quite unusual and even dangerous, so you need your teammates to diligently watch the other passage and not let enemies come up behind you. Also, the main condition for this spot is that the automatic doors leading to the passage from the central part of the map must be closed. If all the above conditions are met, it will be very easy for you to control this entry. In case enemies start breaking the doors, you can always make several successful kills and simply stop them, thanks to abilities or simple shots. Moreover, from this position, you can aggressively play towards the other entry if enemies are not rushing to capture the plant.
4

Another position allows you to control the passage from mid, but it is located on the other side of the doors. From this spot, you can see part of the passage, and with a single precise shot, you can stop enemies and force them to rotate. Note that this part of the location is quite large, so you can step back, climb up the boxes to an elevation, or simply retreat towards your plant. Moreover, if you want to play it safe, you just need to move to the right, to a spot marked with a blue arrow. This will allow you to let enemies advance deeper into your territory, to effectively eliminate them from behind.
5

The last position on point A is also well-known. It is located in front of the Spike planting site, and below the elevation where the first spot on our list is placed. The peculiarity of this position is that it allows you to play both openly aggressive and closed, waiting for an enemy mistake. At first glance, this shelter seems quite small and may suffer from enemy abilities, but in reality, it is not so. In fact, the position is almost as wide as the plant itself and has two protected corners that are hard to hit with abilities. Therefore, this place can rightfully be considered one of the best on point A.
Point B
1

The first spot on point B is located near the defense side's spawn, and immediately before the entrance to the plant. The position itself is quite simple and will allow you to control the main entry from the enemy spawn. The distance to the enemies at this point is quite large, so it is worth choosing a weapon whose damage remains high even at such a distance. Note that you definitely need allies who will provide information about the central part of the map, otherwise enemies can easily come up behind you.
2

The next spot allows you to directly control the passage from the central part of the map, but if you close the automatic doors, you will have the opportunity to focus your attention on another passage. Note that this spot is quite dangerous. There is no possibility to hide from enemy shots or abilities, rotating and retreating from this position is very difficult, and besides, the thin walls behind which you will be hiding are penetrable. But these minuses are completely offset by the functionality of the position, which will allow you to effectively stop enemies from both directions.
3
Another spot, whose usability depends on the state of the doors and your allies who must watch your back. From this spot, you are the first in the team to meet enemies entering through the main passage. This position also has several advantages, the first of which is that it is located above ground level, giving you an advantage in an encounter with an enemy. The second feature of this place is the ability to hide. If two or more opponents emerge from the main passage, you can quickly move forward, thus going down and finding yourself behind the protection of a wall. But this spot has a significant minus, which is that there is very little space below, and you can easily be bombarded with abilities, and it is almost impossible to escape from there because you will always be in the line of enemy fire.
4

Next, we have a spot that allows you to play closed, and it should be used when enemies have already entered the location and plan to plant the Spike. From this position, you can monitor both entries, but it is quite difficult to do so. Therefore, it is better if you have living partners who can watch one of the passages so that you can focus your attention on the other. Note that the walls that protect you are completely penetrable, which opponents can take advantage of. In such a case, you can descend from the boxes to the very bottom, which will allow you to be more protected.
5

The last position on point B is similar to point A and is located in front of the planting site as maximally enclosed. From this spot, you can control both passages, although not very successfully, or focus on one. This position also allows you to control the plant itself, and often enemies may forget to check this place, giving you an advantage. But unlike point A, this corner is quite inconvenient because it has two entrances, although its walls are not penetrable. The position is quite situational, so we recommend considering the state of your team before occupying this spot.

Conclusion
After reading our material, you learned about the best spots on the Ascent map for the defence side at both Spike planting points. Continue following our portal to learn about positions for the attack side, as well as about spots on other maps in Valorant.


No comments yet! Be the first one to react