

Bind is one of the most unique maps in Valorant, distinguished by its non-standard structure—it lacks a mid lane and stands out with the presence of teleporters that allow quick movement between spike sites. These features make the Bind map in Valorant unique from other maps and require a special playstyle, making it a must to master.
In this article, we will tell you how to improve your skills on the Bind map in Valorant, regardless of whether you are a high-ranking player or a beginner. We'll also share a complete guide, from choosing agents and positions to strategies and markings on the map so you can dominate it.

Bind Map Review
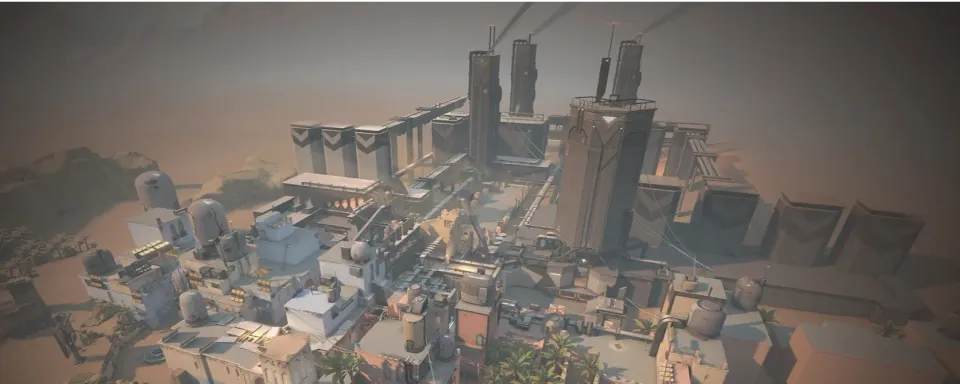
Bind is located in Morocco on Alpha Earth, where the Kingdom Corporation exploited radianite resources. The map's aesthetic combines elements of ancient Morocco and high-tech infrastructure, with narrow corridors, open areas, and pronounced choke points that influence strategy in both attack and defense.
Map Design:
Valorant's Bind map layout features two spike points, A and B, and lacks a traditional central zone, forcing teams to approach the map with specific point control strategies. The lack of a central passage means that control of key zones such as Showers, Hookah, and B Long becomes critical to map control.
Attackers can either make direct pushes or use map control to create false rotations, while defenders must maintain choke points to counter potential attacks. You can read more about the best positions on the Bind map in our materials.

Teleporters:
On the bind val map, there are two teleporters: one connects A Short to B Long, and the other connects B Long to A Lobby. They allow you to quickly change the point of attack, which attackers can use to confuse defenders or carry out a fake attack. However, teleporters have a distinctive sound that makes using them risky without proper planning, as defenders can easily hear the rotation and adjust to it.

Environmental Factors:
The combination of narrow corridors (e.g., Hookah, Showers), open areas, and tight passages on the Bind map forces players to be aware of their position. The environment shapes the dynamics of gameplay, requiring teams to coordinate in the use of abilities such as smoke screens and blinds to capture zones and execute strategies effectively. On this map, characters like Skye, Viper, and Cypher are especially important, as they can control narrow spaces well; you can read more about the best agents for the Bind map by visiting this material.
Map Symbols on Bind
Designations at Point A:
- A Short: A narrow passage leading directly to the site, often used for quick attacks.
- Showers: A small room next to A Short, offering an alternative entrance to the A site.
- U-Haul (Lamps): A closed area on Site A that provides cover but can become a trap if enemies attack from multiple directions.
- Heaven: An elevated position with a view of Point A, suitable for defense when the spike is planted.
- A Backsite: The back of the site, useful for holding positions.

Symbols at Point B:
- Hookah: A small room with a window leading to Point B, often an early encounter area.
- B Long: A long, narrow path leading directly to Point B, often used for attacks.
- B Garden: An area outside of Point B that provides cover and rapid rotation.
- B Elbow: A narrow corner near Point B, used to hold defensive positions.
- B Backsite: The back of Point B, ideal for planting the spike and subsequent protection.

Map with Symbols:
Take a look at the labeled Bind Val map below to better understand the important locations on Bind.

Best Agents for Bind
Controller: Viper
Viper is effective on Bind in Valorant due to her ability to block visibility with Toxic Screen and use one-way smoke screens. Her abilities are great for controlling tight areas such as Hookah and B Long, and also for limiting the visibility of attackers on A Short and in Showers.
Strategies:
- Install one-way smoke screens in Hookah to prevent enemies from peeking without revealing themselves.
- Place the wall across A Short to block visibility and delay attacks, allowing your team to rotate.
Sentinel: Sage
The Sage Wall can block key passages such as Hookah or A Short, delaying attacks and giving defenders time to rotate. Her Slow Orb is also useful for slowing down enemies in tight areas such as Showers on the Bind Val map.
Strategies:
- Use Sage's wall to block A Short at the beginning of the round, forcing attackers to turn or destroy it.
- Throw a Slow Orb into Hookah to make quick attacks more difficult.
Duelist: Raze
Raze's explosive abilities make her one of the best choices for Bind. Her Frag Grenades can control narrow passages, and Boom Bot is ideal for clearing tight spaces. Teleporters allow for surprise attacks using Boom Bot, which can catch enemies off guard.
Strategies:
- Throw Frag Grenades into Hookah or A Short to disrupt the enemy's plans.
- Use the teleporter after planting the spike to make a surprise attack with Boom Bot.
Initiator: Fade
Fade's Haunt ability reveals large areas of the map, making it easier to gather information. Her Prowlers can clear tight corners, and Seize forces enemies to abandon defensive positions, making her a very powerful agent in Valorant on the Bind map.
Strategies:
- Use Haunt to cover areas near teleporters, identifying enemy rotations.
- Apply Seize in Hookah or Showers to trap enemies, allowing your team to capitalize.

Alternative Agents:
Other top agents such as Brimstone, Omen, and Killjoy can also be effective on Bind. Brimstone's smokes are great for blocking visibility, Omen can use teleporters for unexpected flanks, and Killjoy's devices will help control key areas such as Hookah.
Agent | Role | Benefits on Bind |
Viper | Controller | Visibility blocking, one-way smokes |
Sage | Sentinel | Delay attacks, post-plant defense |
Raze | Duelist | Area control, explosive attacks |
Fade | Initiator | Intelligence gathering |
Brimstone | Controller | Universal smoke screens |
Omen | Controller | Flanks via teleporters |
Killjoy | Sentinel | Territory control using turrets |
Bind Attack Strategies
Standard Strategy:
A balanced 3-2 split, with three players attacking through A Short and Showers, and two controlling Hookah/B Long, provides flexibility for attackers, allowing them to rotate or concentrate on one point.
Using Teleports and Fakes:
Use teleporters to fake rotations to deceive defenders and create gaps in their defense.
Spike Installation:
- At Point A: Plant the spike in places that can be protected from Heaven or A Short.
- At Point B: Set the spike while controlling Hookah and B Garden. Use Sage's wall or Raze's grenades to ensure safety.
You can read more information about the attack on the Bind Valorant map in our material.
Bind Defense Strategies
Play for Retake:
Often it is necessary to carry out retakes on Bind, especially on B, where attackers have multiple entry points. Use the abilities of agents such as Sova or Fade to collect information before the retake, coordinating the use of utilities.
Aggressive Hookah Control:
Start the round with aggressive actions in Hookah using agents such as Jett or Raze. This will help gather valuable information about the enemy's location.

Holding Showers and A Short:
Control over Showers and A Short is critical to point A defense. Agents such as Viper or Sage can use their abilities to slow down enemy attacks, making them difficult to replace.
Defending Point B:
Organize crossfire with teammates from Hookah, B Long, and B Backsite to make it difficult for attackers to enter. You can read more information about the attack on the Bind card in our material.

Advanced Tips and Tricks for Bind Map
- Activating Teleports Using Cypher: Use Cypher's camera to activate teleporters without having to enter them, confusing opponents.
- Flank Options: Omen and Yoru can use teleporters for unexpected flanks, catching opponents by surprise.
- Map Control: At the start of each round, prioritize controlling areas such as Showers and Hookah to limit the enemy team's options.
- Advanced Ability Usage: Use agents such as Sova or Killjoy to prevent the enemy from defusing the spike and clearing the spike zone with ultimate abilities.
At the time of writing, these tips are still working, but if you encounter problems using them, you should look at the update history of the Bind map. After all, developers regularly release patches, and sometimes they can even break something with their release.
For inspiration, consider reading quotes from professional players about the Bind map, which can offer valuable insights and strategies.
Professional Level Strategies
Study professional teams such as LOUD, who are known for their strategic approach to selecting agents on Bind during VCT. Analyze their positioning, ability usage, and decision-making to improve your game. Here are some specific examples from the team's match:

- Pistol Round in Defense: LOUD used a combination of abilities to play aggressively on the B bombsite. Raze, Astra, and Sova started on B Long while Skye and Viper held Hookah and the A bombsite respectively. Thanks to Skye's flash, Sova's Recon Bolt, and Astra's Star Recall, the three B Long players were able to advance and catch the enemies hiding in Viper's smoke, resulting in a clean win with no casualties.
- Spike Installation Failure: LOUD effectively used abilities to delay the enemy's spike setup. For example, in a half-buy round, the A bombsite was attacked, but LOUD's Raze used her ultimate to kill one enemy and delay the planting. Skye then used her Trailblazer, and Sova used shock darts, forcing the attackers to abandon their plan and switch to Site B.
- Standard Defense: For most rounds, LOUD placed Skye and Viper on B and Raze and Astra on A. Sova would start on A Heaven to provide early scouting and then move as needed. The team would occasionally switch positions, such as swapping Raze and Astra between Showers and A Short to add variety to the defense.
- Pistol Round Attack: LOUD initially tried to control Showers with Raze, Sova, and Skye, while Astra held B Long and Viper covered A Short. After the failure at Showers, the team regrouped at A Short. Enemies that advanced on A proved to be easy prey for LOUD, allowing them to capture the point and win the round, remaining in a 5v2 situation after planting the spike.
- Control of Showers: In attack, LOUD often prioritized taking control of Showers in order to get an orb for their ultimate. They used combinations of abilities to clear an area and force the defenders to expend their resources. Once Showers was captured, LOUD would shift their attention to other parts of the map, making it difficult to predict their next moves.
- Default Attacks: LOUD used a variety of set formations to confuse the defense, including a 4-1 B-side default (with Astra and Sova on B Long, and Raze and Skye in Hookah) and a Showers default involving Sova, Raze, and Skye, while Astra and Viper covered other directions.
These strategies demonstrated LOUD's ability to control the pace of the game, forcing opponents to act reactively, and exploiting the agents' abilities to gain advantageous positions.
If you additionally want to learn the best points for smoke screens, we recommend that you read our guide on their use.
VOD Reviews and Scrims
To learn from professionals, it is recommended to regularly watch game recordings (VODs) and participate in scrims. Studying gameplay moments at a professional level helps understand principles of proper positioning, effective use of utilities such as Viper's Pit, Extinguish the Lights, Dark Cover, and other agents' abilities, as well as decision-making in difficult and stressful situations. This helps to improve skills and adapt more quickly to changes in the game.
Conclusion
To successfully master Bind, you need to understand the layout of the map, choose agents wisely, and implement strategies, taking into account strong team communication and the correct use of utilities. Constant training, both in normal and ranked modes, will help strengthen your skills. It is also important to be able to adapt your strategy depending on the composition of the team and the characteristics of the enemy in order to achieve stable results.


No comments yet! Be the first one to react