

While the release of Windows 11 is certainly a joyous event for most users of this operating system, many gamers are asking "can you play valorant on windows 11?" The answer is yes, but with some caveats. Riot Games' shooter has had various bugs since its inception, most of which have been thoroughly studied, and the community knew how to deal with them. However, this is not the case with the new version of the operating system. Valorant is compatible with Windows 11, but since the release of the new Windows version, players have encountered many previously unknown errors. Most of them relate to secure boot, which directly affects Vanguard and the proper functioning of Valorant. Therefore, today, the Bo3 editorial team has prepared material to tell you how to fix the Valorant secure boot windows 11.
The Cause of the Problem

Although the secure boot issue in Valorant has been around for a long time, it has become relevant again with the release of the new Windows version, primarily because Windows 11 users don't know how to fix it. The problem appears as follows: when you launch Valorant, you receive an error window, VAN9001 or VAN9003, along with two common messages: "This version of Vanguard requires secure boot to be enabled" or "this version of vanguard requires tpm 2.0." This directly indicates that secure boot has been disabled, most likely due to the transition to Windows 11. For many players wondering "how to play valorant on windows 11," the solution lies in understanding and properly configuring these security features. As a reminder, secure boot is a Windows technology that ensures that the files loaded onto your PC meet all security standards. Vanguard, the anti-cheat system, requires this feature to function correctly with Valorant. Therefore, if you have issues with secure boot, you won't be able to launch the game. Below, we'll explain how to fix the secure boot Valorant windows 11.
Check Secure Boot on Your PC
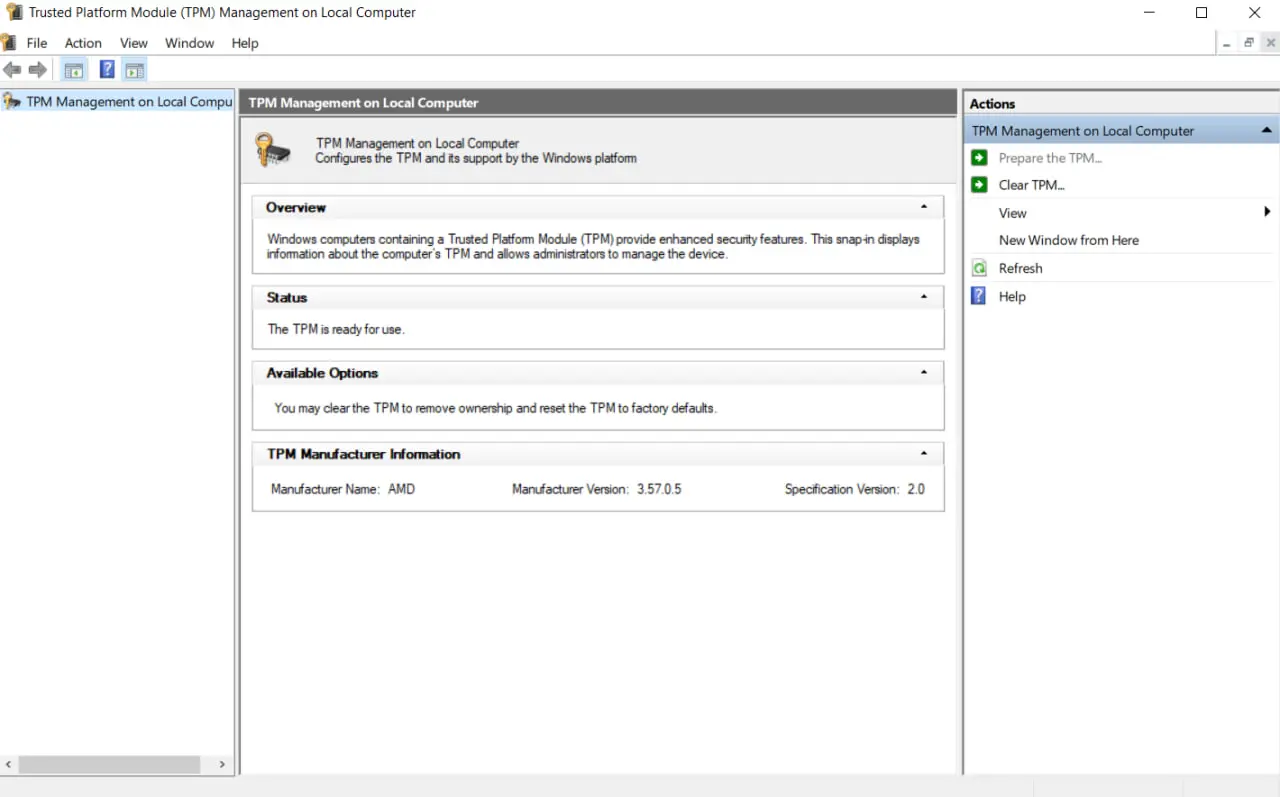
First, you need to check if secure boot is enabled on your device. Based on the information obtained, you can then proceed with the next steps. Here's how to do it:
- Press the Win + R combination.
- In the window that opens, enter the command tpm.msc.
- Find the "Status" section.
- If it says "The TPM is ready for use," then secure boot is enabled on your PC.

Enable Secure Boot
If you followed the previous step and found that secure boot is not enabled, you need to activate it. This can only be done through the BIOS system, but many users feel intimidated by this term and are hesitant to intervene in their PC's operation. Note that you don't need to be a programmer to enable secure boot, and its activation will not negatively affect your device. To enable secure boot in the BIOS, follow these steps:
- Restart your PC.
- During the reboot, press the key that opens the BIOS (this may differ depending on your system: F1, F2, F10, F12, DEL).
- In the BIOS menu, find the "Boot options" section.
- Then select the "Secure Boot" option and enable it.
- After that, restart your PC again.

This method should almost certainly help you resolve the secure boot issue and fix the van9003 Valorant Windows 11 , among others.
Run Valorant as an Administrator
Another method that might help you overcome the secure boot issue is running the game as an administrator. Although this option might not always be the correct one, if other methods don't work, it's worth a try. To open Valorant as an administrator, right-click on the game icon and select the corresponding option. However, you can simplify the task so that you don't have to repeat these actions every time. To do this, right-click on the Valorant icon again but choose "Properties" this time. Then, in the settings window, find the "Compatibility" section and select "Run this program as an administrator." Now, every time you launch Valorant, it will automatically run as an administrator, saving you from repeating the same steps each time. This method may also help you fix the valorant windows 11 secure boot error.

Conclusion
After reading our material, you have learned why the Valorant protection issue may arise and how to enable secure boot. Although considerable time has passed since the new Windows version was released, the community has not yet studied all possible errors and ways to fix them.


Comments1