

We continue to inform our readers about the best positions on all maps in Valorant for both attack and defense sides. Today, we return to the Fracture map, which is one of the least favorites for the entire Valorant community. Thanks to the ziplines that split the map into two parts, it is considered better for the attacking side players, but even so, it is not particularly favored and is sometimes avoided. However, Fracture remains in the general map pool of the game, and while it is not currently in the general rotation, it could return at any moment. Thus, today, the Bo3 editorial team has prepared material for you in which we will tell you about the best places on the Fracture map in Valorant when playing on the attack side.
Point A
1

Although this position has already been in our list when playing on the attack side, and the point itself is quite well-known, you cannot avoid using it. When entering not plant A from the other side of the map after using the ziplines, this is the only passage, so you will definitely be using this point. From this spot, you get a view of the left part of the plant, and if you move to the corner marked with a blue arrow, similarly, you can watch the right part. Overall, this position is very convenient, you are always on a higher level than your enemies, and you also have the opportunity to retreat safely after which conduct a rotation to B, or try this plant again but from a different direction.
2

The second place in our list is already from another direction of entry to the plant, as this is usually where the main attack of the attacking team occurs. This position is located right behind the automatic doors and leads to the plant itself, and partially to the defender's spawn point. From there, you can move to the plant, or by the vertical zipline go up and get behind the enemies, or even conduct a rotation to plant B. The main disadvantage of this position is that the automatic doors open automatically, only when you approach them. Thus, the defending players, who will be controlling them, will have an advantage over you. But in this case, there is also another side, you can always run away from the doors before they open, to find out if there are enemies on the other side.
3

The next position is located right after the previous one and from there opens a view of the plant itself. Although at first glance the place is open, it is actually well protected. Your back is covered by a wall, and the enemies who will conduct rotation from plant B will most likely go through their spawn, so you will also be safe. The only uncovered place remains on the side of the automatic doors, so in this case, you need to rely on sound. If you have a good reaction, as soon as you hear the sound of opening, you will be able to quickly turn around and kill the enemy. If there are too many of them, or your shooting does not allow you to accurately kill the enemy with one shot, you can always move forward, and take a more advantageous position.
4
The next point is of a closed type and is already located on plant A itself. In a relatively safe position, you can continue to control the plant, and if you have broken through to the point you can control it until the arrival of allies. Also, from this position, it is very convenient to control the installed Spike, you can always hide from enemy shots, and also do not have to be afraid of the opponents' abilities because the platform itself is quite large. Blue arrows indicate places where you can move in case of danger, to covertly observe the Spike and try to stop opponents.
5

The last position on point A is located almost on the defender's spawn itself and is quite situational. Although this point can be used when your team is just taking the plant. For this, you need to go through the automatic doors and go up on the zipline, after which you can monitor the platform. But it is better to use this position when you quickly took point A, and the enemies remained mostly on B. In such cases, they need to conduct a rotation, and their main path will go right through your position. You can try to kill them, or just delay them so that the opponents do not have enough time to enter the plant and defuse the Spike.
Point B
1

The first place on point B is standard, most players use it when entering the plant. From this position, you can effectively destroy enemies, but depending on their location, not all weapons will suit you. Enemies waiting on the platform itself and nearby will be at close range, so most available weapons will suit you for their destruction. In turn, enemy snipers may be in more distant positions, so if you are also armed with a sniper rifle, we do not recommend entering the plant first. Initially, it is better to let allies who will deal with close enemies go first, so that you have the opportunity to shoot at enemy snipers without special obstacles.
2

The second position is already on the plant itself, a little above the Spike installation platform. This is usually where the defending side players like to hide, which we talked about in our previous material. From this point, you can monitor the plant, as well as control the Spike. The dangers of this position are the same as when playing on the defense side. The corridor itself is quite narrow, so there is almost no opportunity to escape from various abilities, and another passage to this position is equipped with a zipline, which can be used silently, using the shift key. Therefore, we recommend not forgetting to occasionally check the other passage so that the enemy does not catch you by surprise.
3

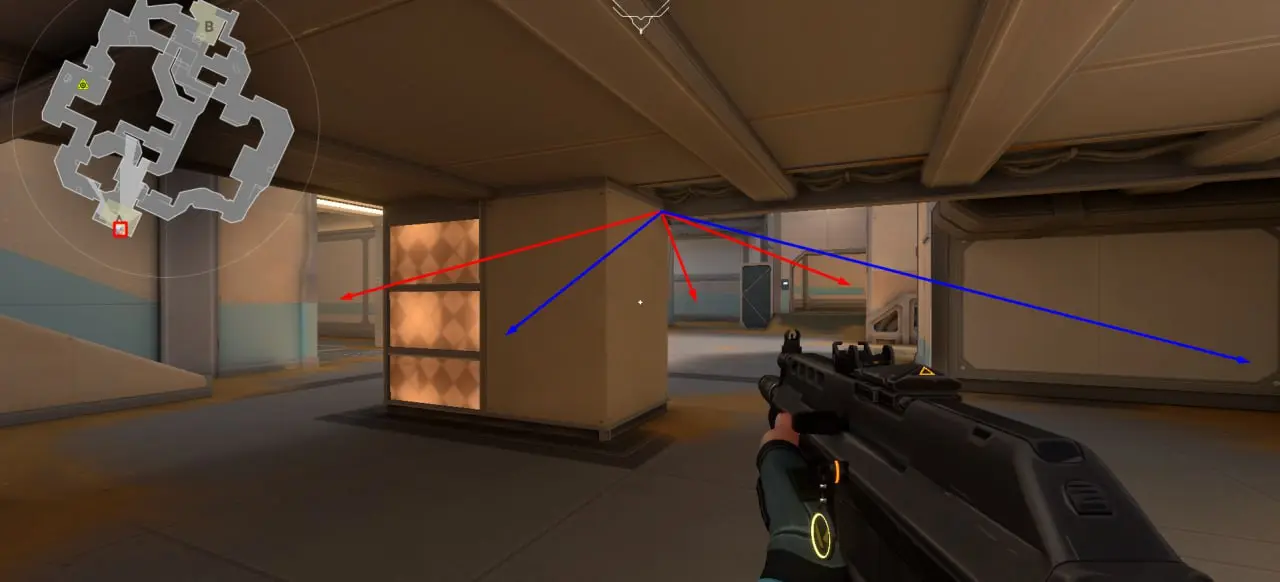
The next position on point B is quite unusual, and it is located in an underground passage. Players rarely use this transition because it is much easier to use the zipline and end up in a more advantageous position. But despite this, we advise you to sometimes still use this position. From here, you can safely check the point we wrote about in the previous paragraph, after which either go up there, or go left, which will end up on the side of the enemies and try to kill them. In addition, this position can be used when saving weapons, or when opponents play aggressively and instead of guarding the point, they themselves go out in search of enemies.
4

A similar point was also in our previous material when playing on the defense side, but for the attack, it is used a bit differently. To get to this position, you can go through the defender's spawn side from point A, or just through plant B itself. In the second case, your team has likely already occupied the location, so you just have to stay in place and monitor the installed Spike. But we recommend not forgetting about your own back because due to the peculiarity of Fracture, enemies can unexpectedly appear behind your back.
5

The last point on plant B is also quite standard, and it is located on the Spike installation platform itself. The position is quite protected, so enemies cannot unexpectedly approach you from behind. But other directions remain open, so do not use this point when you are left alone against several enemies. The best option is for one of your allies to be on point 2 and monitor the narrow corridor, and another to discreetly wait at point 4. In this way, they will not be visible to enemies, but can control the Spike using sound and your information.
Conclusion
After reading our material, you have learned about the best positions on the Fracture map when playing on the attack side. Note that the text reflects the subjective opinion of the author, and there are many other places on the map that can be used depending on the situation. Continue to follow our portal to learn more about the best positions on each map in Valorant.


Comments