


We continue to inform our readers about the best positions on all maps in Valorant for both sides. Today, we return to the Sunset map, which is the penultimate location added to the game. The map has only two spike planting sites and lacks teleporters or other special tools. This makes Sunset relatively easier for defenders, but even when playing on the attacking side, the map feels balanced and fair. Therefore, today, the Bo3 editorial team has prepared material for you about the best positions on the Sunset map when playing on the attack side.
Point A
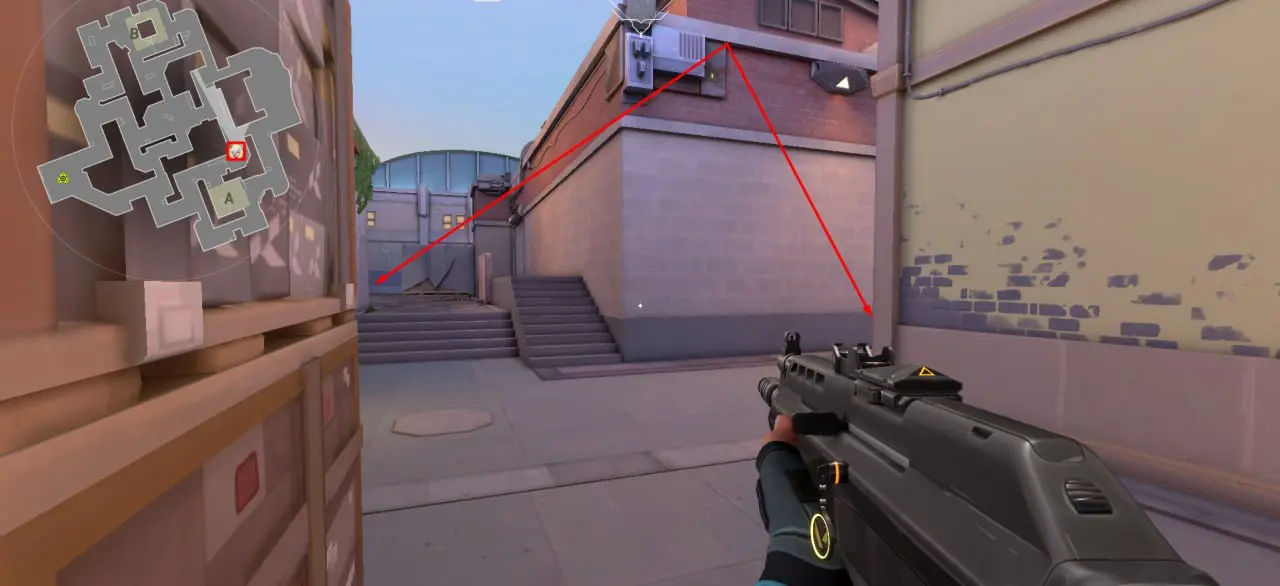
1

The first position at the A site is located right at the entrance to the spike planting area. From this point, you are likely to start taking over the A site because it is accessible from one of the two available directions. Although this position is quite dangerous, as you need to watch two passages, you don't have much choice if your team has decided to take the A site. Also, this position lacks adequate cover, with only a green box that can be fully shot through. However, this position also has a plus; you can use it once your team has planted the Spike. This way, you can monitor the pathway to the central part of the map to stop rotating defenders.
2

The second position was already listed when playing on the defense side, but the simplicity of the approaches to the A site doesn’t give players many options, so the same positions are used when playing for both sides. From this spot, you can watch part of the spike planting area and, most importantly, the pathway leading to the defender spawn point. Thus, it is most effective to use this position once the Spike has been planted. Consequently, you will be closely monitoring the area and the pathway where enemies are likely to move.
3

The next position is quite unusual and may seem ineffective at first glance. But in reality, when used, it wonderfully works as an element of surprise. If you managed to quickly rush to the site using smokes or other abilities, occupying this position is the best option. From here, you can monitor the entire area and main approaches, using the box as cover to distract enemies, allowing your allies to also reach the site. This spot can also be used when the Spike has already been planted, and your team is defending it.
4

This position, unlike the previous ones, is effectively used only when your team has already taken over the site and planted the Spike. It is located at the exit from the site and leads directly to the central part of the map. The main function of this position is to control mid and delay enemies. When your team has planted the Spike and most enemies are on site B, you need to find a strategic position to intercept opponents. This spot does just that, offering a view of the main long passageway, where opponents are likely to move, and partly the second corridor. Additionally, from this position, you always have the option to retreat to your team and return to the site if there are too many enemies.
5
The last position on the A site serves the same function as the previous one, namely delaying enemies and defending the planted Spike. It is located right at the exit from the spike planting point, and offers a view of the only long passageway. When your team has planted the Spike, you can immediately take this position to stop enemies trying to enter the site. Interestingly, unlike the previous position, here you control only one direction, making it ideal for sniper rifles, the best among which is the Operator. Additionally, in case of danger, you can always return to the site and take a safer position.
Point B
1

The first position on point B is located right at the entrance to the site, and it is widely known. This spot is used by all players when advancing on site B from this direction. From this position, you can partly monitor the spike planting area, and if you move closer to the spot marked with a blue arrow, you will also get a partial view of a small corridor near the site, where defenders are likely to be. The main problem with this position is the distance to the opponents. If the opponents are directly in front of you, the distance is moderate, but if they are hiding behind a large column in the middle of the site, it will be problematic to kill them from this point. Therefore, we recommend killing the nearest enemies or using smokes before entering the site.
2

The second position is located at mid and leads directly to the corridor mentioned in the first point. When approaching this spot, you will most likely face automatic doors, which cannot be opened from your side, so you need to destroy them. Remember, the HP of the doors is 500, and enemies will always know when they start being destroyed. Therefore, we recommend destroying the doors and immediately hiding in the right or left corner to avoid getting a headshot right after the doors are destroyed. The passageway itself is quite dangerous because enemies can expect you from two directions and hide behind a box. Therefore, we recommend checking the room for opponents or entering only under a flashbang.
3

The third position, like the previous two, is located at the entrance to the spike planting point. But unlike the two previous ones, which are quite easy to reach, this spot is located towards the defender spawn, making it quite dangerous to get there. However, if your team is attacking from other directions, and you have information that all enemies are on site B, you can easily use this position. It allows you to appear behind your opponents and effectively eliminate them while they are not expecting it. Additionally, you can always turn around and monitor the pathway behind you, in case your team has already planted the Spike, and enemies are rotating from site A.

4
The next position, unlike the previous ones, is better used when you have managed to plant the Spike, on the platform right in front of you. After this, you can occupy this corner to safely defend it. You can also occupy boxes to your right, which we discussed in our material about the best positions for the defense side. But both these spots have the same significant disadvantage: there are many directions from which enemies can appear. Being in this position, enemies can unexpectedly come from four different directions. Therefore, if your team is outnumbered, and you cannot monitor all directions, we recommend occupying another position, such as the next one we will discuss below.
5

The last spot on site B is related to the second point because it is easiest to reach it through the automatic doors discussed in the second position of our list. This spot can be used both when entering the site and when defending after the Spike has been planted. As we wrote above, this position is safer if your team is in the minority. Unlike the fourth point, where there are no covers, from this position, you can monitor passageways and the planted Spike, and in case of danger, you can always hide behind cover. This position can also be completely covered, focusing only on the sound.
Conclusion
After reading our material, you learned about the best positions on the Sunset map in Valorant when playing on the attack side. Continue following our portal to learn about positions on other maps in Valorant, including the latest added map, Abyss.


No comments yet! Be the first one to react