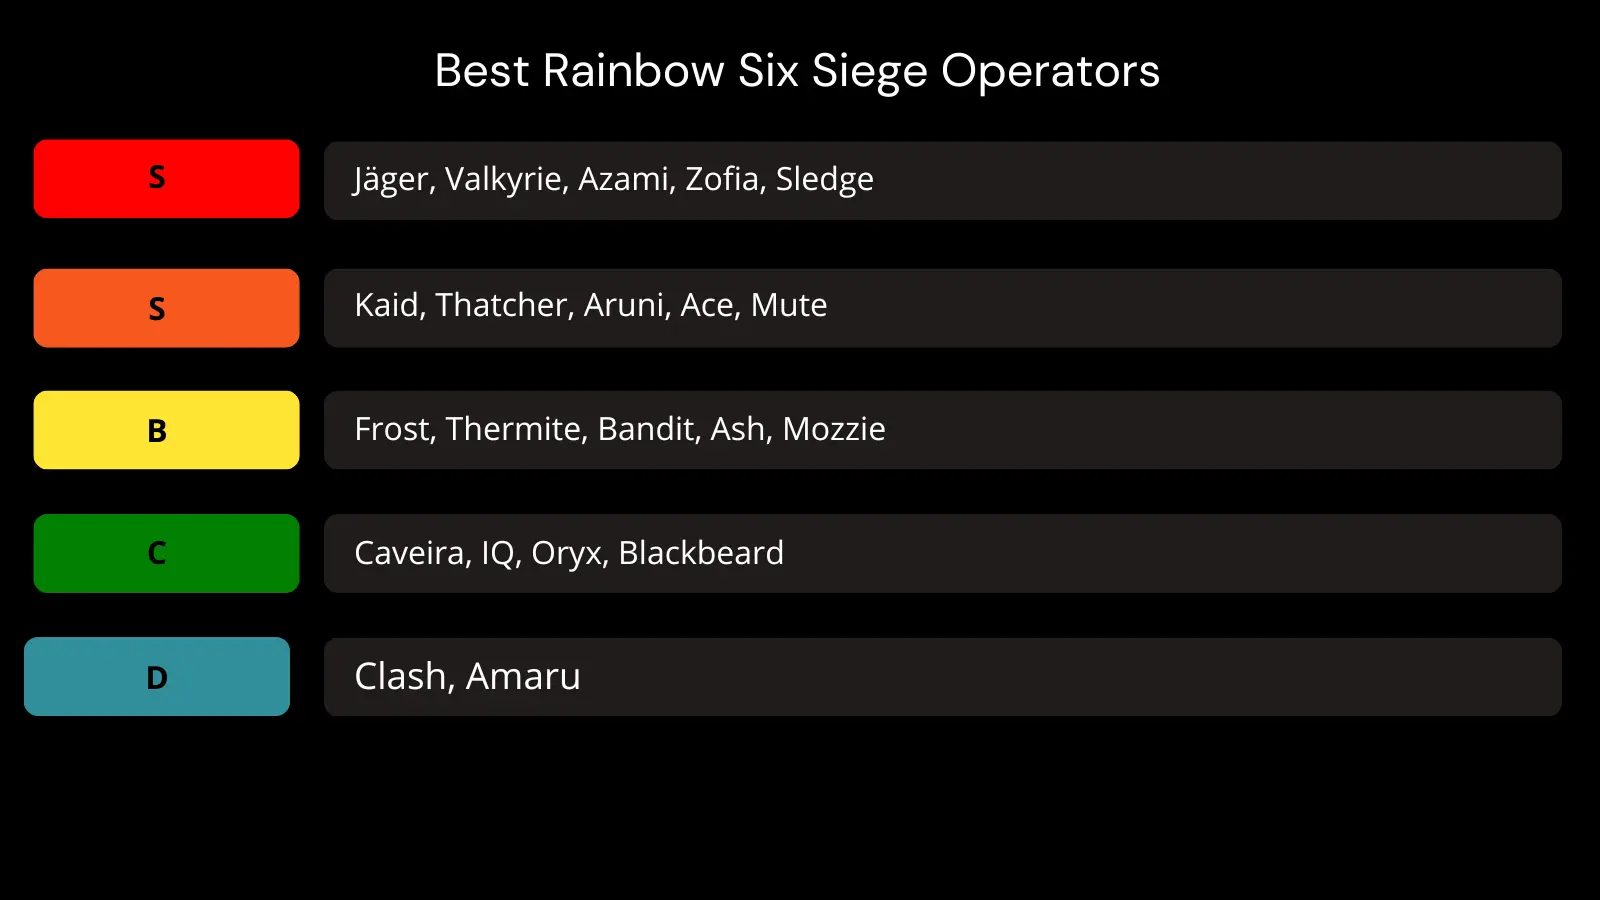
Rainbow Six Siege offers a variety of operatives, each with unique skills and gadgets that can change the course of a match. Here you'll find a tier of operatives that we've divided into five categories based on their overall utility, influence, and versatility.
What is the Tier List and how are the operatives categorised?
- S-Tier: These are the most effective operatives. They excel in any situation and add tremendous value to the team.
- A-Tier: Strong operatives who consistently perform well. Although they are inferior to the S-Tier, they remain a reliable choice.
- B-Tier: Versatile operatives who are effective in skilful hands or under certain conditions.
- C-Tier: Operatives with limited effectiveness. They have a narrow specialisation and are more often inferior to others.
- D-Tier: The weakest operatives in the current meta, whose utility is extremely low.
D-Tier Operatives
Clash (Defence)
The only defender with a shield, but her slowness and limited utility make her a weak choice.
Amaru (attack)
Garra Hook allows Amaru to hit certain spots quickly, but her predictability and low utility make her vulnerable.


C-Tier Operatives
Caveira (Defence)
Caveira is deadly in the hands of an experienced player, but her reliance on stealth and interrogation makes her a risky choice.
IQ (attack)
IQ is useful for detecting electronic devices, but her gadgetry often becomes situational against other operators.
Oryx (defence)
Oryx's high mobility thanks to Remah Dash is impressive, but its ability often leads to risk.

Blackbeard (attack)
His shield on his rifle has become less effective since the nerf, making it lose a lot of its relevance. But he's still not the worst choice.
B-Tier Operatives
Frost (Defence)
Frost traps work well against inattentive attacking operatives, but at high levels of play they are easily avoided. This is why Frost can be a useful choice at small to medium levels.
Thermite (attack)
Thermite remains a solid choice for breaching fortified walls, but his slowness compared to other Breachers sometimes gets in the way.

Bandit (defence)
The Bandit's current wire is still effective for blocking fortified walls, but its role has been significantly reduced due to the introduction of new operatives.
Ash (attack)
Ash's explosive charges are great for breaking soft walls and destroying gadgets, but she's not as strong as she used to be.
Mozzie (defence)
The Mozzie gadget allows you to effectively strip drones from enemies, but its use requires precise placement.
A-Tier Operatives
Kaid (Defence)
Kaid's electric claws are key to defending fortified walls and trapdoors, making him a strong choice for holding points.
Thatcher (attack)
Thatcher remains a top pick for disabling enemy gadgets, although he is often banned in ranked matches, as he can make a big difference in a match.
Aruni (Defence)
Aruni's Surya Laser Barrier effectively blocks passes and damages attackers, providing strong space control.

Ace (attack)
Ace has throwable charges that allow them to quickly destroy fortified walls and trapdoors.
Mute (defence)
Mute jammers are versatile and effective for blocking drones, breachers, and coordinating attackers.

S-Tier Operatives
Jäger (defence)
The ADS Jäger neutralises grenades and projectiles, providing critical protection for the team. Its mobility and powerful weapons make it a must-have choice.
Valkyrie (defence)
The Valkyrie's cameras provide valuable information, allowing the team to coordinate actions and counterattacks by enemies.
Azami (defence)
Azami's kiba barriers allow for real-time changes of cover and blocked lines of fire, making her incredibly versatile.
Zofia (attack)
Zofia's grenade launcher is versatile, suitable for destroying gadgets, stunning enemies, or creating holes.

Sledge (attack)
Sledge's sledgehammer is indispensable for breaking down soft walls and controlling the map, making him one of the most reliable attackers.
This tier helps highlight the best Rainbow Six Siege operatives for the current meta. Choose S-Tier and A-Tier for maximum success, while C-Tier and D-Tier are left for experimentation or specific cases. With the right choice of operatives, you can be stronger in every round and lead your team to victory.


No comments yet! Be the first one to react